


But life gets in the way! This doesn’t mean I am not crafting or reading your lovely comments and emails. I feel bad. I have not replied to some of your comments and questions straight away even though I feel privileged that you are stopping by and taking time to read all this. But I will try and post more now that everything has calmed down a bit.
So first thing, we have moved home. A nice big house where everyone can have their own room! Yes, I now have a sewing room!!! whoo hoo!!! It is a summer house, it is in the garden, it has not yet been fully restored but it is all mine! I have a lot of space, electricity, heating, WI-FI. It’s amazing and cannot wait to start redecorating it. Photos of the inside to follow soon (hopefully as I depend on my husband’s good will for that one).
Because moving was stressful and time consuming, it was difficult to find time to create anything at all. But you know me, I cannot stay too long away from a sewing machine!
My friend bought me for my Thirtieth a great book called “Gerties new book for better sewing” and managed to make two garments so far.
 Having done a bit of patchwork and quilting I wanted to investigate the dressmaking side of sewing. I am really enjoying it and find the challenge interesting even if I still find it scary to cut the fabric around the pattern!

zipped skirt

summer retro blouse
Going to Brighton to The Sewing Center, I found this amazing and unusual grey and yellow fabric and bought enough to make a cushion for my new living room and a matching lamp shade. The result is striking (even if I do say so myself!) and is going really well with the colour scheme.

 We spent the summer (a full month) in San Francisco where my husband was working.We stayed in Livermore, a sweet little town on the outskirt of San Francisco. People were nice, the food was amazing, the weather was heaven, the clothes really cheap, the apartment were we stayed was idyllic. Let’s just say none of us wanted to come back. When visiting the town center I was hoping to find a quilting/fabric shop and.. TA DA!!! I found the most exquisite little shop called “In between stitches”.

got so excited in there!
The ladies were very welcoming, helpful and chatty. The range of fabrics was astonishing, I had never seen anything like it! I was in HEAVEN!! I spent an hour the first time (yes I came back several times after that!) I was very sad to leave Livermore for that shop only!

trying to keep calm....

OMG I cannot contain myself!!
I bought a little bit of fabric but really wanted to buy it all. It is sooo cheap compare to the UK. The only thing stopping me was luggage space ( I bought so much clothes too, it was hard to close the suitcases!). I bought grey and yellow fabrics to make a quilt for my second living room:
 I have drawn a plan of the quilt I would like to make:
 I will post a tutorial for that one soon (but cannot promise too soon!)
I bought more fabrics on sales to make skirts and some more fat quarter but not sure what I’ll be doing with then yet!
 I absolutely flashed on that one:
 I have no idea what to do with it but just knew I had to get it!
I have a lot of projects I have planned to sew, I just need to get myself organised with work and family time. I have just finished redecorating my husband’s office and would like to make him a little framed cross stitch:

 We are fans of the IT Crowds and my hubby’s a geek so thought it might look good on his office wall!
I also would like to finish all my cross stitch projects (3 on the go). I like some of Helen Tran’s designs, they look dainty and pretty.
The list is pretty endless really: finish some quilts that need to be sandwiched and quilted, make more skirts and blouse as I have bought the fabrics, sew with my son as he loves it and finish his table mat… just so many ideas and little time!
But what I really would like to do is blog more often. I love to do it, I love to sit down to write down my past projects and future ones and I love to see so many of you taking time to read my babbling!
Happy sewing everyone!
It’s been nearly a year since I last blogged… Phew! It was about time! Life just got in the way: illness, work, children. It didn’t stop me from doing a bit of sewing here and there but nothing major and I guess my creative me went to sleep for a while!
I bought lots of new fabrics and I’m looking forward to making new projects and share them with you! 2014 will be artistically productive (I hope)!
I also get many comments and emails of support, questions, corrections and I’m always so happy to see my inbox letting me know I got mail from my fellow sewers! So keep them coming!
I wanted to share with you a little tutorial that I made with my 8year old. Yes my eight year old! He’s the one who came up with the idea, chose the colours, took pictures, ironed and sew a little bit. I couldn’t say no to that!

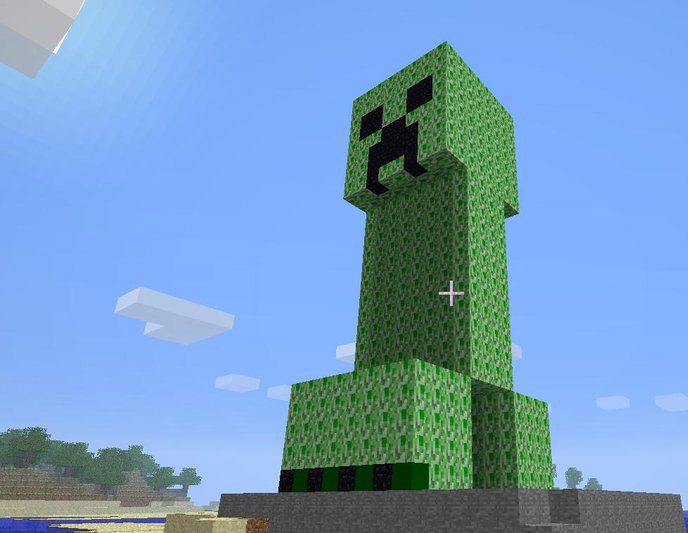
So if your child is into “Minecraft” then you’re in for a treat! Matteo made a Creeper cushion!
Here is what you will need:
 Different shades of green (we found out that the less pattern, the better) fabrics, white fabric, black fabric, your usual sewing attire and a very keen little boy!
We planned our Creeper on that image:
 You will need 64 squares but for the black parts of the creeper we used rectangles.
Here is what Matteo did to explain what we cut:

 these are rectangles, and the width is 2″ 1/2 .


 Once all the squares and rectangles are cut make your pattern:
 you’ll notice that along the way we changed a few greens as we didn’t like the flowery fabric.
We sewed the first two row in that manner:


 So that we could chain sew them and gain time and thread.
Don’t forget to press with iron as you go along!

If using the black rectangles, sew this block first then add the top and join sides.
But you could use a simpler way and sew row by row.
 Et voila! You have your top Creeper cushion done!
on to the back cushion!
Now you need to cut:
 (I would say 16″1/2 just to give you enough margin for error)
Make a hem by ironing 1/4th of one long side of the rectangle:
 Fold again on itself and iron:
 Then sew as close as you can to the edge of the hem:
 Repeat for the second rectangle.
Lay the top creeper cushion right face up and add one back rectangle on top of it right face down:
 Lay the second rectangle on top, right face down:
 Pin all around:
 Sew ¼ of an inch from the edge, reversing on the part where the two rectangles meet to make it more secure and clip corners:
 You can now reverse your cushion:
 Insist on the corners:
 Et voila!! A very happy boy !

I have to take my hat off to Matteo who did not give up all day! (yes it took us that long!) this week end my youngest asked to make an Enderman cushion! Look out for a new tutorial soon!
Happy Creeper sewing!
I’ve been enjoying making this baby quilt for one of my colleague :
 I bought some boy fabrics online. i just love the colours and the different designs! So Bright!
 It’s a great present for new borns or for birthdays. So, this is the kind of things I can do for you if you want to offer a quilt or even get one for yourself! I have a new comission to make a bed cover for my colleague, cannot wait to get started!
Do you remember my sampler quilt I was making with my friends for the Birmingham show? that one:

It’s now time to sew them together and I thought I would show you how to do it! Why not have done it before you would ask me! well if you want to do free motion quilting it’s easier to do it on a small squares. So here is how you do it:
 Start by folding the back fabric and the wadding on the side you want to sew them together and pin it:

 Do it for the other square too:
 pin the squares right sides together:

 sew a quarter of inch from the edge:
 press open, lay your tow sewn squares right side facing down. Put a ruler on the pressed seam (you’ll see why later, I haven’t done it in the picture but it’s best if you do) and unfold the wadding:

 and unfold the other side on top of the other wadding piece you’ve just unfolded:
 Next, cut through the two layers of wadding right in the middle make sure not to cut the top quilt but if you’re using the ruler it shouldn’t happen.

 Using a herring stitch, sew the two pieces of wadding together:
 then, unfold one piece of back fabric:
 fold to make a hem on the other side and lay it on top of the other unfolded side:
 Press with an iron:
Using a slip stitch, sew the backing together:

This is what the backing should lookd like:
 Et voila! you are done!
 I’ll see you soon for more fabric frenzies and quilt making!