It’s been nearly a year since I last blogged… Phew! It was about time! Life just got in the way: illness, work, children. It didn’t stop me from doing a bit of sewing here and there but nothing major and I guess my creative me went to sleep for a while!
I bought lots of new fabrics and I’m looking forward to making new projects and share them with you! 2014 will be artistically productive (I hope)!
I also get many comments and emails of support, questions, corrections and I’m always so happy to see my inbox letting me know I got mail from my fellow sewers! So keep them coming!
I wanted to share with you a little tutorial that I made with my 8year old. Yes my eight year old! He’s the one who came up with the idea, chose the colours, took pictures, ironed and sew a little bit. I couldn’t say no to that!

So if your child is into “Minecraft” then you’re in for a treat! Matteo made a Creeper cushion!
Here is what you will need:
 Different shades of green (we found out that the less pattern, the better) fabrics, white fabric, black fabric, your usual sewing attire and a very keen little boy!
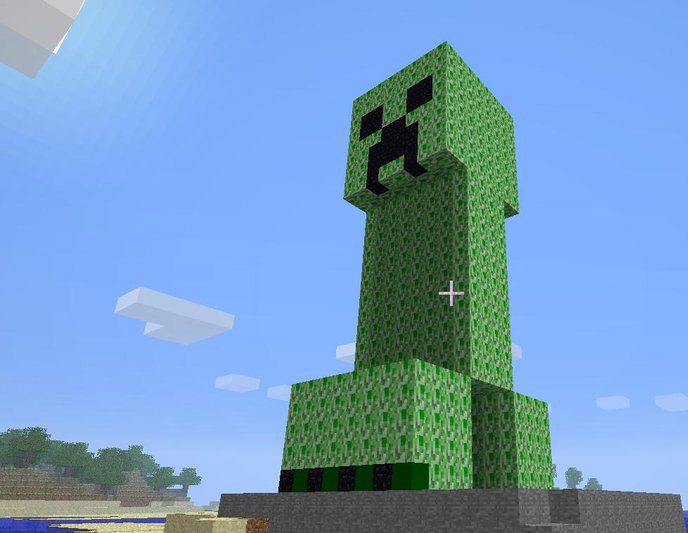
We planned our Creeper on that image:
 You will need 64 squares but for the black parts of the creeper we used rectangles.
Here is what Matteo did to explain what we cut:

 these are rectangles, and the width is 2″ 1/2 .


 Once all the squares and rectangles are cut make your pattern:
 you’ll notice that along the way we changed a few greens as we didn’t like the flowery fabric.
We sewed the first two row in that manner:


 So that we could chain sew them and gain time and thread.
Don’t forget to press with iron as you go along!

If using the black rectangles, sew this block first then add the top and join sides.
But you could use a simpler way and sew row by row.
 Et voila! You have your top Creeper cushion done!
on to the back cushion!
Now you need to cut:
 (I would say 16″1/2 just to give you enough margin for error)
Make a hem by ironing 1/4th of one long side of the rectangle:
 Fold again on itself and iron:
 Then sew as close as you can to the edge of the hem:
 Repeat for the second rectangle.
Lay the top creeper cushion right face up and add one back rectangle on top of it right face down:
 Lay the second rectangle on top, right face down:
 Pin all around:
 Sew ¼ of an inch from the edge, reversing on the part where the two rectangles meet to make it more secure and clip corners:
 You can now reverse your cushion:
 Insist on the corners:
 Et voila!! A very happy boy !

I have to take my hat off to Matteo who did not give up all day! (yes it took us that long!) this week end my youngest asked to make an Enderman cushion! Look out for a new tutorial soon!
Happy Creeper sewing!