I know it’s been a while since I last posted but half term turned out to be horrible as I got the flu and the nasty type! But I’m all better and I’m coming back with a quilt tutorial!
I bought a long time ago this fat quarter bundle and decided I was going to make a chevron quilt for my eldest son. It took me a while to get started but I have finally managed to do it. Now that the weather is warmer you’ll tell me, but better now than never!
So here it is: to start this project you will need:
– 8 different fat quarters (you will have some left over),
– about half a metre of plain fabric to match your fat quarter (if you want to, you can keep using patterned fabric)
-backing fabric,
– 2 fat quarters for the binding,
-quilting thread,
-and all the necessary sewing attire (sewing machine cutting matt, rotary cutter…)
Start by cutting your fat quarters into 5 ½ “ squares, you’ll need 8 of each fat quarter plus 24 of your plain fabric.
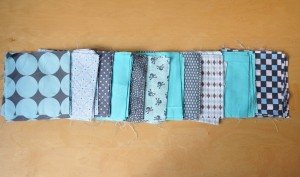
Next you need to decide how you are going to arrange your square. Once you’ve decided, keep them in that order until you’ve done the following steps:
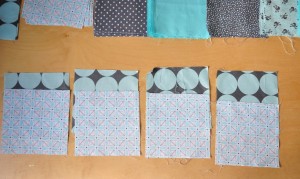
Grab 1 square from your first pile and 1 square from your second pile.
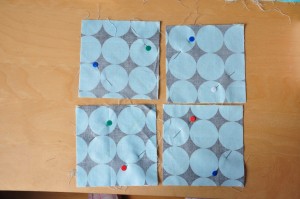
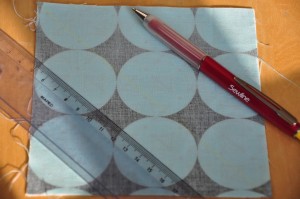
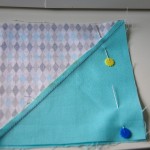
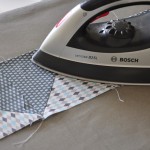
Pin them right sides together draw a line on the diagonal
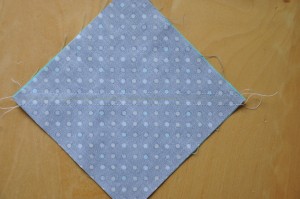
and sew ¼ of an inch away from your drawn line:
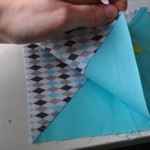
cut on the diagonal drawn line:
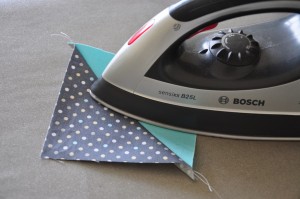
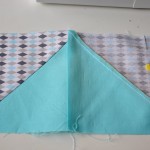
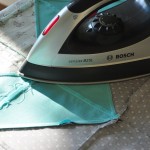
press seam to one side and cut “ears”:
Repeat those steps for 3 other squares of each first and second pile.
Now, grab 4 squares from second pile and 4 squares from third pile, pin them right sides together, draw a diagonal line and sew ¼ of an inch away from that drawn line.
Repeat those steps for all of your squares.
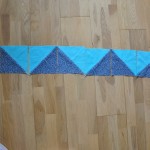
You now have lots of little piles of half square triangles.
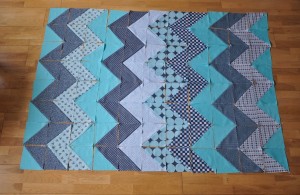
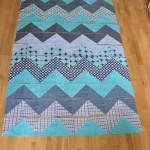
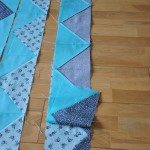
Arrange them on the floor so that they make zigzags.
Pin right sides together the first row and sew a quarter of an inch away from the border.
You do the same for all the rows. Then you sew your rows together. Press the seams to one side.
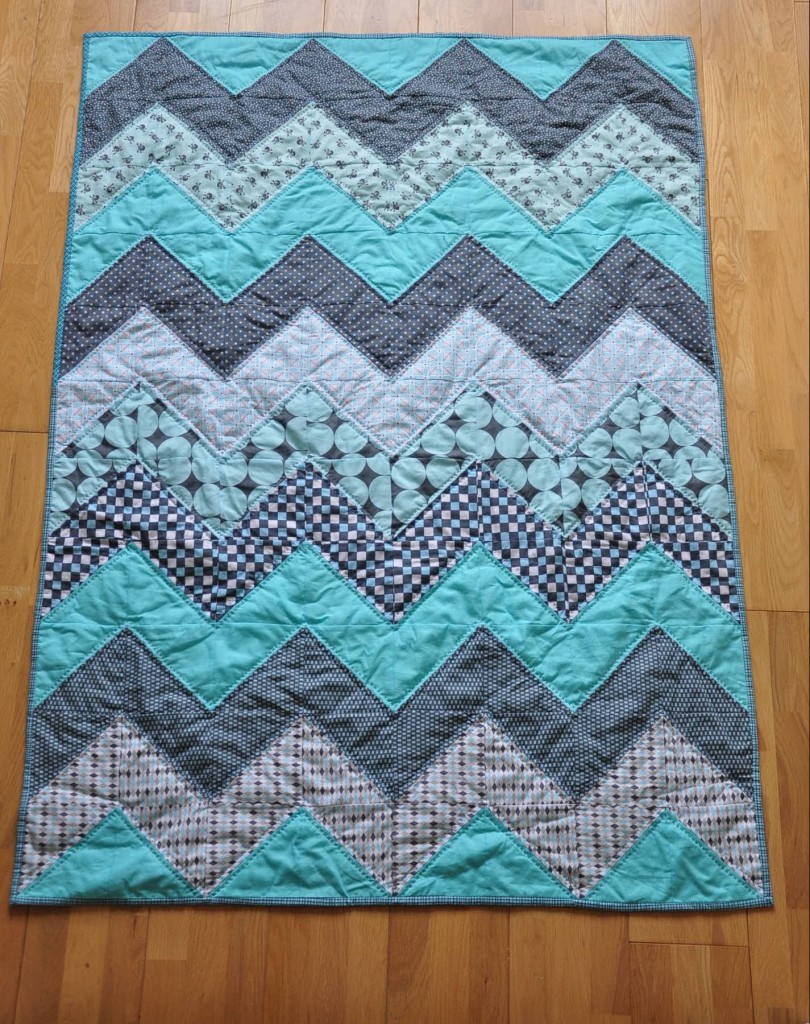
Et voila! You have nice zigzag top quilt.
Sandwich in that order: backing wrong side up, batting, and quilt top right side up. Tack it, or if you’re a bit lazy like me, pin it together with quilter’s safety pins. I hand quilted mine but do whatever tickles your fancy.
Bind it and you’re done!


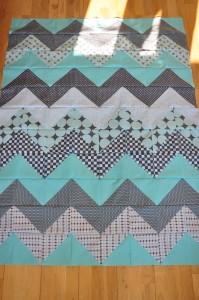
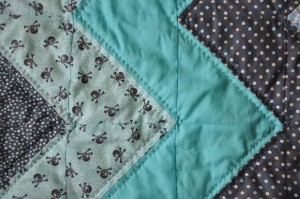
Je n’ai pas tout compris ce que tu as explique mais j’adore ce quit il est très beau
I love it!!! What is the finished size? I really like the fabrics that you chose. I think I’m going to use your tutorial to make quilt for my new baby girl.
Hello!
The finished size is 96x130cm (3ft2″x4ft3″). I know Michael Miller does the same collection for girls in the shades of pink and grey. Please, share your lovely quilt with us once you’ve finished! Happy sewing!
Hi,
thank you for sharing your pattern. I am making quilts for our Veterans and I think they will really like this design.
Your hand quilting is amazing.
What a cute quilt! There should be a note to pay attention to fabric design direction, though. It has some very noticeable cutting/directional errors on the argyle pattern and it is something would be very noticeable if someone where to use a more bold even just a stripe fabric. It would be disappointing to someone new to sewing not to have that instruction and have wasted time and money on blocks that don’t look right. Thanks for sharing your tutorial! 🙂
Thank you Jeanette for pointing that out! you are absolutely right. I cannot believe I didn’t pay attention to it! I will add a note.
I think the “directional errors” make it more unique! This is what I want only queen size. Now to choose my fabrics! 🙂
🙂
My favourite bit: choosing the fabrics!
enjoy!
Love the quilt…Just the way it is.
Thanks for a great tutorial!
I LOVE this quilt. I would like to make it a little bigger. How would you do that? Add some squares to each stack of material? Help??
I guess you could add more squares at the end of each row and also add a row at the top so you would need one more fat quarter and a bit more plain fabric or you could cut the squares slightly bigger to start with. Just make sure you have enough fabric of the same colour. I hope this help.Happy sewing!
Hi! Love this quilt. Do you sell any of them?
Hello !
I do take orders if you are interested. Most of the quilts I have done on the blog have gone to someone but I would be very happy to discuss with you any colour scheme, design and size! Let me know if you are still interested and I will contact you via your email. thanks for stopping by!!
I’m new to quilting, and would love to try this. What measurement of fabric is needed for the backing and the binding? Also, did you hand quilt along the diagonal? Do you have any recommendations for machine quilting this (I’m not sure I would know which direction to quilt in)?
Hello there!
For the backing you would need 1mx1.40m. For the binding I used 2 fat quarters but you will have some left so you could always ask to cut some fabric from the bolt (about 40cm). I indeed hand quilted it along the diagonals to emphasis the chevron design. You can machine quilt it as it would be quicker following the diagonals too.I was taught to quilt from the middle and out. You would need to baste it first to hold everything in place, I use quilters safety pins starting from the middle and out. First in a cross and then diagonally. I hope this helps, thanks for stopping by and leaving a comment! Happy sewing!
I have made one quilt! Just decided I wanted to and had no clue really of what I was doing. I finished it and it fits my king-sized bed nicely and it turned out pretty good also. I wanted to make a Chevron because I love them and found your site. I have read in a half dozen places that a quilt should be started in the middle. My first one I started at the top and kept attaching rows of sandwiches! I am making quilts for each of my grandchildren for Christmas. Ashley’s has an appliqued horse and little girl in the middle that I am working around and this Chevron is going to be the beginning of my grandson’s quilt. Don’t know yet what I am going to do about the second granddaughter! I don’t have much experience, so I am really not profuse at this and it toys with my anxiety issues!! Thanks for sharing this pattern and I love it just the way it is
I’m glad you’re experimenting with quilting! I know what you mean, it is exciting but it can get a bit nervous sometimes cutting into the fabric and getting everything right. Glad you liked the chevron quilt and making it! Come back again and happy sewing!
Lovely quilt. Your directions and pictures were so clear. Thank u
You for sharing.
Dee
Great job – I am going to make one using squares / triangles and it looks like that would be easier than the other Chevron’s I have seen.
Hi! I have found that using two strips sewn together and then cut into the squares is much easier and quick than making it square by square. I’m finishing a KS bedspread as a gift to my brother and bride for their wedding and finished the top in a week! Ironed and all. So you may want to try it! I would post a pic but can’t see how. Happy quilting!
I enjoyed making your quilt, thanks for posting the pattern and instructions. It went together nicely and the instructions were easy to follow.
Thanks for posting the simple and clear tutorial! I am halfway done making this as a baby gift and it is already looking great!
Hi I’m really interested in learning how to quilt. I love your pattern and it seems simple. Would you recommend this for a beginner with absolutely no experience in quilting?
Hello Ashley!
I would recommend you try something simpler. Maybe just squares to start with so that you don’t feel discouraged if you find it hard. But then again my first quilt was a hexagon one. So really it’s up to you and how confident you feel about it! if you have more questions don’t hesitate! Good luck with your first quilt!
Love this idea. My daughter wants a beach quilt. This looks quick and easy so I think I’ll show her this pattern!
Hello! I am a first time grandmother, grandson due in August. I love to sew but haven’t been into it for years. I am going to “attempt” to make his bassinet cover, sheets, and a quilt. I love this chevron pattern and the colors. Can you tell me where you purchase your fabric? thanks, Kim
Hello Kim!
Congratulations on the news! You are going to be very busy for the next couple of weeks!I bought the fabrics online at Fatquartershop.com. The collection is called “it’s a boy!” by Michael Miller. I hope you can still find them otherwise try maybe ebay. Happy sewing Kim!
hi i was wondering how much of each fabric you need( not measured in fat quarters) that would help alot!! and is this closest to a full, queen, or a king.
-Need to know how big a fat quarter is?
Hi there! a fat quarter is usually 18″ X 22″ or 45cm X 56 cm. Hope this help! happy sewing!
My daughter is expecting our first granddaughter first week in August. I have recovered car seat from a tutorial she sent me from Pinterest, have made her chevron curtains with the help of YouTube.com, made dust ruffle from a pattern I purchased and will be making the bumper pad from her design and now she found YOUR chevron quilt tutorial!!! I want to give you a very special “THANK YOU” for sharing this and honestly by using the fat quarter sizes there is enough fabric left over from bumper pad to match EXACTLY. The bumper pad in one section will have her given name monogrammed on it, I do small monogramming as well.
If not for tutorials I would have been lost. So, now she has her very own customized baby girl bedding set! Again thanks!
Oh, this will be our 4th grandchild, the others are all boys, ages 11, 6, 4. The 2 oldest are my sons and he and his wife are expecting their 3rd baby end of 2013 or beginning 2014. They do not know gender at this point.
Thank you for your lovely message, I’m glad this is the right one for you! You sure are going to be busy! It think it’s lovely that you are making your 4th grandchild so many things. It’s always greatly appreciated when someone take the effort to create a gift, I’m sure your daughter will love and cherish the set!
I would love to see the end result!
Happy sewing! x
I signed up to receive emails/comments but the activation states it has expired. I would like TO follow and even follow you online for suggestion and ideas.
Hiii, how do I go about buying one like this? I love it especially the little skulls.
Contact me please
april_wiseman@hotmail.com
Hello! It’s from Michael Miller set called “It’s a boy”. You can buy it from the fat quarter shop online or they still have it at the sewing centre in Brighton: http://www.brightonsewingcentre.co.uk/michael-miller-fabric/michael-miller-aye-aye-baby.html
I hope this help!
Happy sewing!
Found your lovely tutorial on Pinterest! I love it. Went shopping today with no plans in mind for what style quilt to make, and your’s is the winner. It’s so beautiful, and honestly, simple. LOVE IT! Thank you for sharing. This will be the first Chevron quilt I’ll make.
I am still somewhat of a novice to quilting and am having difficulty figuring out how much backing fabric to purchase.
Thanks in advance! I love this quilt.
I was wondering what color the aqua-ish solid is that is used for quite a bit of the quilt. 🙂 I am having a hard time pin pointing a good color match.
Thank you for your tutorial. I am making my first quilt ever and appreciate the easy instructions with pictures!!! I don’t know how to upload pics, but will be happy to share with, when its finished 🙂
Thank you for sharing this tutorial! It is excellent! I am a little more than half way through making the squares using a similar color pallet. My 2nd grand baby (gender unknown on purpose) is due in 4 1/2 weeks and my daughter requested this quilt after she found it on Pinterest. I will post a picture after it is completed.
Please do! I love it when people show me their work! And congratulations! 🙂
I am not sure how to upload a picture! I will give it a try 🙂
This is adorable! I would like to do this chevron pattern for my school quilting project, but I would like to do a double bed size! Can you help me with measurements? Thank you!
I would cut more squares at the beginning. In total (using the square size I used in this tutorial) you will need 234 squares to make a finishing quilt measuring 1.40m X 1.80m (double bed size in UK). I think, then again maths is not my cup of tea… each square measures 11cm ish so 13 squares for the width and 18 squares for the length. That should do it. Please don’t hesitate to contact me again if you have questions! hope you pass!
I would love to make this quilt and have made a sample with10 in. block or layer cake size. I would like the quilt to be 60 x 80. I do not know how much fabric to buy or how many layer cakes i would need. Can you help. thanks Elva
aghh!! Maths and me! I’ll try to help but that’s not my forte! Do you want the quilt to be 60″X 80″? a layer cake has 42 squares measuring 10″ each so once sewn together you will loose a bit (half an inch plus a bit as cut on the diagonal). In total you need 48 squares so I would say 2 layer cakes so that if you find that the quilt is too small you can add more. I hope this help a bit. Happy sewing!
I was just wondering if you would call that a lap quilt, i just love it and iam going to try it,
The size I chose makes it a lap quilt indeed. I’m glad you like it! happy sewing!
We call it a TV rug, as a lap quilt the kids wont use it, hahaha
ah! love it!
I just wanted to tell you that I used your tutorial to make our first grandson his first quilt from Nana. Our daughter found your pattern and she and I worked on it together. I backed it in flannel and used it for the binding. Henry adores it and loves to snuggle in it. Thanks so much for sharing!
could you please convert the measurements to yards? 1m x 1.40m
Hi there! 1 yard is about 1m and so 1.40m is 1.53 yards. Google does very good conversions too. hope this help!
I am so happy I found your tutorial, my daughter wants a chevron quilt and I’ve never done but squares. I enjoyed your clear explanations. However I was wondering how much fabric to buy off the bolt vs. fat quarters for a full-sized quilt or even a queen? Thank you so much again for sharing your knowledge and experience with us.
So glad you’re enjoying my blog! I would double everything for a double size quilt. so off the bolt ask for half a meter of each fabric. Terribly sorry for belated answer but hope this helps. Happy sewing!
I used your directions and made 2 perfect zigzag quilts! Thanks so much for sharing.
Saved as a favorite, I like yyour web site!
it is gorgeous, wonder if we can make 4 at the time like I was shown before, put two squares together, sew all the way around with a quarter inch seam and cut into 4 diagonally and hey presto, 4 bits! Don’t know how to calculate the inches though, we are in metric, am in Auckland New Zealand
Pingback: 20 Baby Quilts for Beginners
nice quilt! Would love instructions for the binding to follow. Thanks!
Hi
I was wondering if is better to do the Chevron quilt in 5″ or 10″ squares. How many squares of each would I need to make a queen size quilt. Love your tutorial.
hi ! I’m just curious to know what is inside this ? I mean is there anything like spong or something like that … Thanks … I just love this and want to make one
I use Heirloom batting for quilts 100% cotton. here is a website that sells them https://www.cottonpatch.co.uk/acatalog/Hobbs_Heirloom_Premium_Cotton_Batting_Crib_Wadding.html?gclid=COuIss_34tECFUI_Gwodsg4Pvg
I have also used in previous quilt when money was scarce, polyester and a lot more fluffy but if you are new to this hobby, quilting with thin bating is easier. hope this help! Eve
I’m curious what you used for the back. I am making one in lavender and gray cottons and just can’t decide what to use for the back. I would love to know what you went with.
I was lucky to have found some black fabrics with grey head skulls on sales so that is what I used, but usually i am quite tight with my fabric and use rather cheap plain fabrics (wether it is coulourful or white) or calico. Hope this help!
Great tutorial. Not sure how to post pic
I’m embarrassed to say that I’m confused. I followed your instructions, making 4 squares from each set of piles, but that left me with 4 squares in each of my first 10 piles and all of my 11th pile. How do I group my fabrics for rest of my original squares? Thank you for your help! I’m really excited to figure out how to make this quilt. It’s beautiful!
i am not good at metric measurements. How many yards of fabric for each different color chevron stripe do I buy for a queen size quilt? Thank you.
I am new to quilting and very much want to make my grandson one of these quilts. It looks easy but when you said to make a diagonal line then sew 1/4 in away from the line……was that both sides of the line? I’m sorry if this is a stupid question but I need to ask. Thank you
Hello! i think i have replied to your comment by mail as i was at work, but yes on either side of the line you have drawn, you need to sew a quarter of mile from that diagonal. Happy sewing! Eve
Very nicely done! I also applaud your hand quilting of it. Years from now, it’ll make it even more precious! I try to hand quilt at least part of quilts I make for family members, for just that reason.
One part of the tutorial confused me, near the beginning. It suddenly says something about two pile of fabric squares that we’ve decided upon, and I don’t see anything before that of how or why to make two piles?
I’m a fairly experienced piecer, so I’m sure I can figure it out, but curious anout it.
Thank you for a lovely pattern, it’s perfect for a rainbow baby quilt for a neighbor.
Hello! I see what you mean, it is a bit confusing. I meant to say choose two fabrics that you wish to pair together to make the chevron and you end up with one pile of a certain colour and another pile of another colour. Hope this help a bit! Happy sewing and thanks for stopping by!
Hi! I’m a fairly new quilter and have made several baby quilts out of blocks and then tried my hand at making one with a heart pattern in the middle. The heart quilt gave me an introduction into making square triangles, so now I cannot wait to try my hand at making one of these chevron quilts.
Thank you so much for the easy-to-understand instructions and photos. I was able to understand most all of it.
I do have a question for clarification, though. After making the square triangles from the 1st and 2nd piles, is it true that we then do the same for the rest of the 2nd pile and half of the 3rd? And then the rest of the 3rd and half of the 4th? And so on? Are we overlapping the piles?
Thank you.
hello there! yes it is true, but if you are not sure or confused I would lay the triangle square on the floor and pick them up and sew as you go along and replace them on he floor until you have sewn all your rows. Hope this help. Happy sewing!
Hi Eve! Yes, laying out all the rows in a line and putting them in order helps me a LOT. My husband set up a folding table in my sewing room so I can do this. Even though I don’t let my cat (or any food or drinks) into my sewing room, I still don’t like to lay anything out on the floor. Laying out a pattern, especially a new one, is great advice. Thanks!
By the way, I should mention that I figured out the answer to my question. In case anyone else was wondering the same thing, we do indeed take 4 from the 1st pile and 4 from the 2nd pile to make half square triangles (hst), then the remaining 4 from the 2nd pile and 4 from the 3rd pile to make more hst’s, then the remaining 4 from the 3rd pile and 4 from the 4th pile, and so on and so on……
You will see how well this system works if you keep everything lined up in the order you want them in before making your hst’s.
As a fairly new quilter, I am finding this pattern very easy and manageable so far. I’m at the step where all my hst’s are laid out and I’m sewing them together to make my row. ♥
I finished it today! It came out really nice. Not bad for a beginner. All my points matched, which had me really excited because that is a huge accomplishment for me. I wish I could post a picture of it. This pattern and directions was super easy to follow! Thank you so very much quiltylicious!
Thanks for the most recent clarification on how the piles. I will lay mine out to be sure, as I’ve already sewn too many together on row 1!
Michele
Pingback: akcrb's quilts
Thank you for sharing your project. Just finished my quilt in red, white and blue for my grandchild who is due in July. It came out beautiful and was a joy to work on.
Pingback: Chevron Quilt Block Pattern Gallery | Quilt Pattern Inspirations
Pingback: Stylish Pattern For Chevron Quilt | Quilt Pattern Inspirations
Pingback: Cool Chevron Quilting Pattern | Quilt Pattern Inspirations
Pingback: Interesting Chevron Quilt Pattern Using Triangles Gallery | Quilt Pattern Inspirations
Pingback: Modern Chevron Quilt Pattern Queen Inspirations | Quilt Pattern Inspirations
Pingback: 8 Fat Quarter Friendly Quilt Patterns – Quilting
Pingback: Chevron Quilt - Housewife2Hostess